
Denim Jacket Iron-On Patch Guide: Size & Position
Table of Contents
You pick a patch because it looks right in the photo. When it arrives and you hold it against your jacket something feels off. It’s smaller than you pictured or you can’t decide whether it belongs on the back or the chest.
It’s tempting to heat the iron anyway, since the patch is already in your hand. But once the glue has set, a patch that sits a little crooked is hard to put right. Most of that comes down to two things. How big the patch is and where it goes and those are what this guide covers.
Why Denim Works Well for Iron-On Patches
Iron on patches have a layer of heat-activated glue on the back. The iron melts it, and the glue grips the fabric underneath, so how well a patch holds depends on that fabric. Denim is thick cotton with a flat surface, which gives the glue even contact and handles the heat. The glue bonds poorly to nylon, leather, fleece, and stretch fabrics.
Check the care label before you start. Some denim jackets contain elastane, and a fleece lining or a collar in another fabric won’t take the heat the same way. Once you know your jacket suits iron-on patches, size is the next thing to settle.
How Big Should Your Patches Be?
It depends mostly on where the patch goes. These are common ranges from patch makers, so treat them as a starting point, not a rule.
| Position | Common size | Note |
| Jacket back | 15 to 23 cm (6 to 9 in) | Room for detailed artwork or one statement patch |
| Chest | 7.5 to 10 cm (3 to 4 in) | Sits comfortably beside a pocket or button line |
| Sleeve or shoulder | 7.5 to 10 cm (3 to 4 in) | Check it lies flat when your arm bends |
| Pocket or collar | 5 to 7.5 cm (2 to 3 in) | Keep these small and away from seams |
If a patch carries words, width decides whether they stay readable. A long name or slogan needs a wider patch. Shrinking the lettering to make it fit leaves text nobody can read from a metre away.
Bigger isn’t always better either. A very large patch can pull attention from the jacket itself and change how the fabric hangs. A patch of 13 to 18 cm (5 to 7 in) already makes a clear statement on denim. Before you buy, cut a paper shape to the size you’re considering and hold it against the jacket. It takes a minute and shows you more than a measurement will.
Where to Place Patches on a Denim Jacket
When you customise a denim jacket with iron-on patches, each part of it suits a different kind of patch, so it helps to go through it zone by zone.
Back
The back is the natural home for one large patch. Centre it between the shoulder blades, then step back and look again, because a patch that seems centred up close can sit slightly off. Check it with the jacket on a hanger or on your own shoulders. The panel falls differently once it has a body inside it.
Chest and pockets
Small to medium patches work best here. Keep them clear of the button line and the pocket flaps, which need to open and close. A patch that sits too near the buttons will catch on them every time you fasten the jacket.
Sleeves and shoulders
Bend your arm before you decide. A patch near the elbow creases with every movement, so the shoulder or upper sleeve usually holds up better. Press the paper shape against the fabric and move your arm to see how it sits.
Seams
Thick seams and rows of stitching leave ridges that an iron can’t press evenly, and the glue grips poorly over them. The edges of the patch are the first to lift. Run your hand across the spot you’ve chosen. If you can feel a ridge, shift the patch a little to one side.
How to Arrange Multiple Patches on One Jacket
Putting multiple iron-on patches on one jacket is mostly a layout problem, and it’s far easier to solve before the iron is hot.
Start with the patch that matters most to you. It might be a large one for the back or a favourite for the chest. Everything else gets built around it, so settle this first.
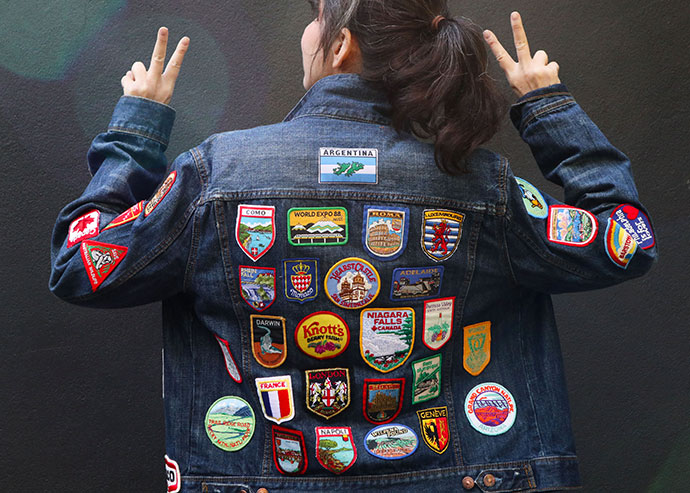
Then mix the sizes. A jacket covered in patches of the same size can look like a sticker sheet. A few larger patches with smaller ones between them give the eye somewhere to rest. Keep the space between patches roughly even too, because uneven gaps are what make a layout look accidental.
To test it before you commit:
- Lay the jacket flat and place every patch where you think it belongs.
- Take a photo. A picture shows crowded corners and lopsided areas that are easy to miss up close.
- Pin the patches on and put the jacket on, or hang it on a hanger. Denim hangs differently once there’s a body in it.
- Adjust, check again, and only then reach for the iron.
Begin with fewer patches than you think you need. Adding another later is simple, but a patch that has been pressed on is hard to move without damaging the fabric. Leave a gap in the layout and fill it when the right patch turns up.
How to Iron Your Patches On
Once the layout is settled, pressing is the quick part. Most iron on patches come with their own instructions, so follow those if they differ from the steps below.
- Wash and dry the jacket, then iron the spot flat so there are no creases under the patch.
- Mark the centre of each patch with a small dot from a fabric marker. It gives you something to aim at when you lay the patch down.
- Set the iron to the cotton setting, usually three dots, and make sure the steam is off. Steam adds moisture that can stop the glue bonding.
- Cover the patch with a thin cloth, such as a tea towel. Press down firmly for 30 to 60 seconds without sliding the iron, because sliding can shift the patch.
- Turn the jacket inside out and press the back of the patch for a short time.
- Leave it to cool fully, then run a finger round the edges. If a corner lifts, press that part again.
Wait 24 hours before the first wash, then turn the jacket inside out and use a cool cycle. Iron on patches are much easier to place than to move once the glue has set, so take your time over that first press.
FAQs To Guide You About Iron-On Patch Placement On Denim Jackets
-
What size patch suits the back of a denim jacket?
Most patch makers suggest about 15 to 23 cm (6 to 9 in) for a back panel, which leaves room for detailed artwork. A patch of 13 to 18 cm (5 to 7 in) still makes a clear statement. Hold a paper cut-out against the jacket first to see how it looks.
-
How many iron-on patches can you put on one jacket?
There’s no set number. It depends on the jacket and the size of the patches. Start with fewer than you think you need, leave a few gaps, and pin everything in place before you press. Adding a patch later is easy, but moving one is not.
-
Can you iron a patch over a seam or pocket?
It’s best to avoid thick seams, because the ridge stops the iron pressing the patch evenly and the edges tend to lift. Keep patches clear of pocket flaps and buttons too, so the jacket still opens and closes properly.
-
Do iron-on patches need sewing on denim?
Not always. Denim is one of the better fabrics for iron-on backing. For a jacket you wear hard and wash often, stitching around the edge gives extra hold.
-
How long should you press an iron-on patch?
Usually 30 to 60 seconds, with the steam off and a thin cloth over the patch. Press firmly without sliding the iron, then press the back as well. Check the patch maker’s instructions first, because heat advice varies.
Need Patches Made to Fit Your Plan?
A layout might need a 20 cm patch on the back and two 8 cm ones on the chest. Ready-made patches rarely land on those exact sizes, so you end up changing the plan to suit what’s in stock. A custom order works the other way round. You start from your measurements and ask for iron-on backing when you order.

As a fashion designer at Iron On Patches UK, I help businesses and people create custom iron-on patches. I help them with what I know about designing patches and what materials to use. I also talk about how to apply patches to different things and what’s popular in the patch world. My goal with the Iron-On Patches UK blog is to help people make premium patches that show their unique identity and how these patches can be a part of their brand. The Iron-On Patches UK blog is here to make it easy for people to customise their patches.