
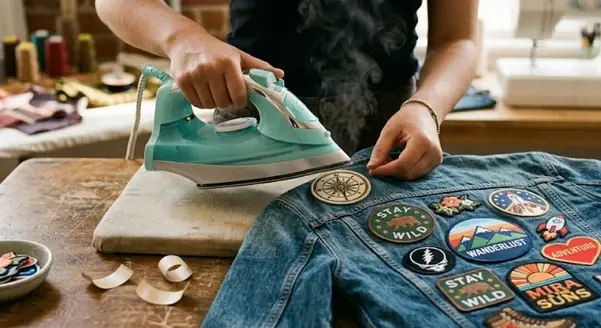
How to Customise a Denim Jacket with Iron-On Patches
Ever caught yourself seeing someone wearing a jacket covered in bold badges and thought, “How did they make something so simple look that good?” or maybe thought how did they make it personal?
That gap between plain and personal is exactly where iron adhesive badges come in. In just a few steps, an ordinary denim jacket can turn into something that becomes your personality, your style and even your story, without needing sewing skills or complicated tools.
If you are also interested in knowing easy ways to customise your denim jacket with iron badges, our blog will guide you with easy steps.
Why Denim Jackets Are Perfect for Customisation
Denim is one of the strongest fabrics. It holds heat well (which means it is perfect for iron-on adhesion), ages beautifully and adapts to both minimal and maximal iron-on badges. It doesn’t even require sewing skills, any hard-to-handle tools and provides instant change.
It is not like one of those delicate fabrics, denim can handle layering, stitching and repeated wear without losing structure. That makes it the ideal base for a little experimentation.
What You’ll Need Before You Start
Before you start to design, it’s important to gather the right tools because a well-prepared setup removes all the hurdles between the process and guarantees that your badges last longer.
Here’s a checklist:
- Denim jacket (clean and dry)
- Iron or heat press
- Ironing board or flat heat-safe surface
- Iron-on badges (custom or pre-made)
- Thin cotton cloth or parchment paper
- Measuring tape or ruler
- Pins (optional for placement)
- UK Iron On Patch Maker (for custom designs)
Planning Your Design
This step is the most underrated one. Most people think they can just stick any patch and call it a design. But this will make your jacket messy rather than a cool designed one.
Ask yourself:
➢ Do I want symmetry or chaos?
➢ Should the design tell a story?
➢ Am I focusing on sleeves, back panel or pockets?
➢ Do I want a theme (travel, music, vintage or minimal)?
What you can do is lay your jacket flat and experiment with placement before applying heat. Take photos of different layouts to prevent regret later and help you visualise the final outcome.
How to Apply Iron-On Patches Step by Step
Applying iron badges is extremely easy. Here is the step-by-step process to apply iron badges to denim:
Prepare the jacket by washing and drying your denim jacket to remove dust or chemicals that may affect the stickiness. Iron it lightly until it is pasted, so the surface is smooth.
Secondly, experiment with where each patch is to be placed before applying. Experiment with variations before committing. Symmetry and creativity are usually the key elements of a good positioning.
Set your iron to a high cotton setting so that there isn’t any steam. Steam weakens sticky bonds, and your patch won’t stick to the jacket.
You should always protect the fabric by placing a thin cotton cloth or parchment paper over the patch to prevent burning or direct heat damage.
Press for 20 – 30 seconds. Don’t move the iron around, press and hold.
Turn the jacket inside out and press again from the back for 15-20 seconds. This strengthens adhesion.
Let it cool completely before checking the edges. If any corner lifts, repeat the heat process.
Patch Placement Ideas & Styling Effects
Confused about the styling ideas? Take a good look below. This table will help you finalise your choice.
| Jacket Area | Style Effect | Best Patch Types |
| Left Chest | Minimal and personal identity | Initials and small symbols |
| Right Chest | Balanced symmetry | Small logos and icons |
| Sleeves | Streetwear and bold expression | Long badges and text strips |
| Back Panel | Storytelling | Large artwork and custom designs |
| Collar | Unique and experimental | Mini badges and metallic accents |
| Pocket Areas | Playful detail focus | Tiny shapes and emojis |
Did you know? Denim jackets were originally workwear before becoming a fashion icon.
Creative Ideas to Make Your Jacket Stand Out
Once you understand the basics, the real fun begins: style direction.
Add badges from places you’ve been or dream destinations. Even abstract symbols like maps, planes or coordinates look beautiful and creative.
If you are fond of music or any particular singer, you can add band logos, lyrics or soundwave badges to give your jacket a personal look.
If you love an old school look, try using classic fonts, crests and muted tones. It will give that retro vintage vibe.
Love to show your messy side? Design with no rules. Use mix neon badges, bold typography, mismatched shapes and layered textures.
Stick to black, white and grey tones. Focus on placement rather than quantity.
Are you aware? Denim actually gets stronger in some areas as it ages.
What Not to Do
Even simple DIY projects can go wrong if rushed. So make sure to watch out for these:
- Using steam while ironing (reduces adhesion)
- Overcrowding badges too closely
- Skipping pre-press flattening
- Not pressing for a long enough period of time.
- Applying badges on textured seams
A good rule: if it looks “almost too much,” remove one badge.
How to Get Custom Iron Patches
If you are tired of those boring and standard badges that almost everyone wears, a UK Iron On Patch Maker can help you design completely customised pieces. They will add creativity to your DIY so that instead of choosing from existing designs, you can create:
- Personal logos or initials
- Matching couple or friendship badges
- Brand style badges
- Artistic illustrations converted into fabric-ready designs
FAQs
How long do iron-on badges last on denim?
Iron-on badges usually last many years if you take care of them. For example, it can last for 25-30 washes with a normal 2-3 years of use.
What jackets are best for iron-on badges?
Some of the best jackets for iron-on badges are denim trucker jackets, canvas workwear, military field jackets or varsity/bomber jackets.
How to make iron-on badges stay on denim?
To make iron-on badges stay on denim, make sure to keep them out of the steam while applying, avoid harsh chemicals while washing and buy a good-quality patch.
What are common mistakes when using iron-on badges?
Some common mistakes when applying iron on badges include not buying the right fabric, using the wrong iron temperature, skipping pre ironing garment, insufficient pressure or time and washing too soon after application.
Final Thoughts
Summing up, customising a denim jacket with iron-on badges is way more fun than you think! When every patch becomes a timestamp of your personality, and your interests are clearly shown on the jacket you wear.
And as we discussed above, the beauty lies in imperfection. Slight misalignments, layered textures and spontaneous decisions create the most iconic results. So if you are new to this, just go for it, and you will love it.
Lastly, take your time, plan loosely, experiment freely and let your jacket become something no store could ever sell: a version of you stitched into denim.

As a fashion designer at Iron On Patches UK, I help businesses and people create custom iron-on patches. I help them with what I know about designing patches and what materials to use. I also talk about how to apply patches to different things and what’s popular in the patch world. My goal with the Iron-On Patches UK blog is to help people make premium patches that show their unique identity and how these patches can be a part of their brand. The Iron-On Patches UK blog is here to make it easy for people to customize their patches.