
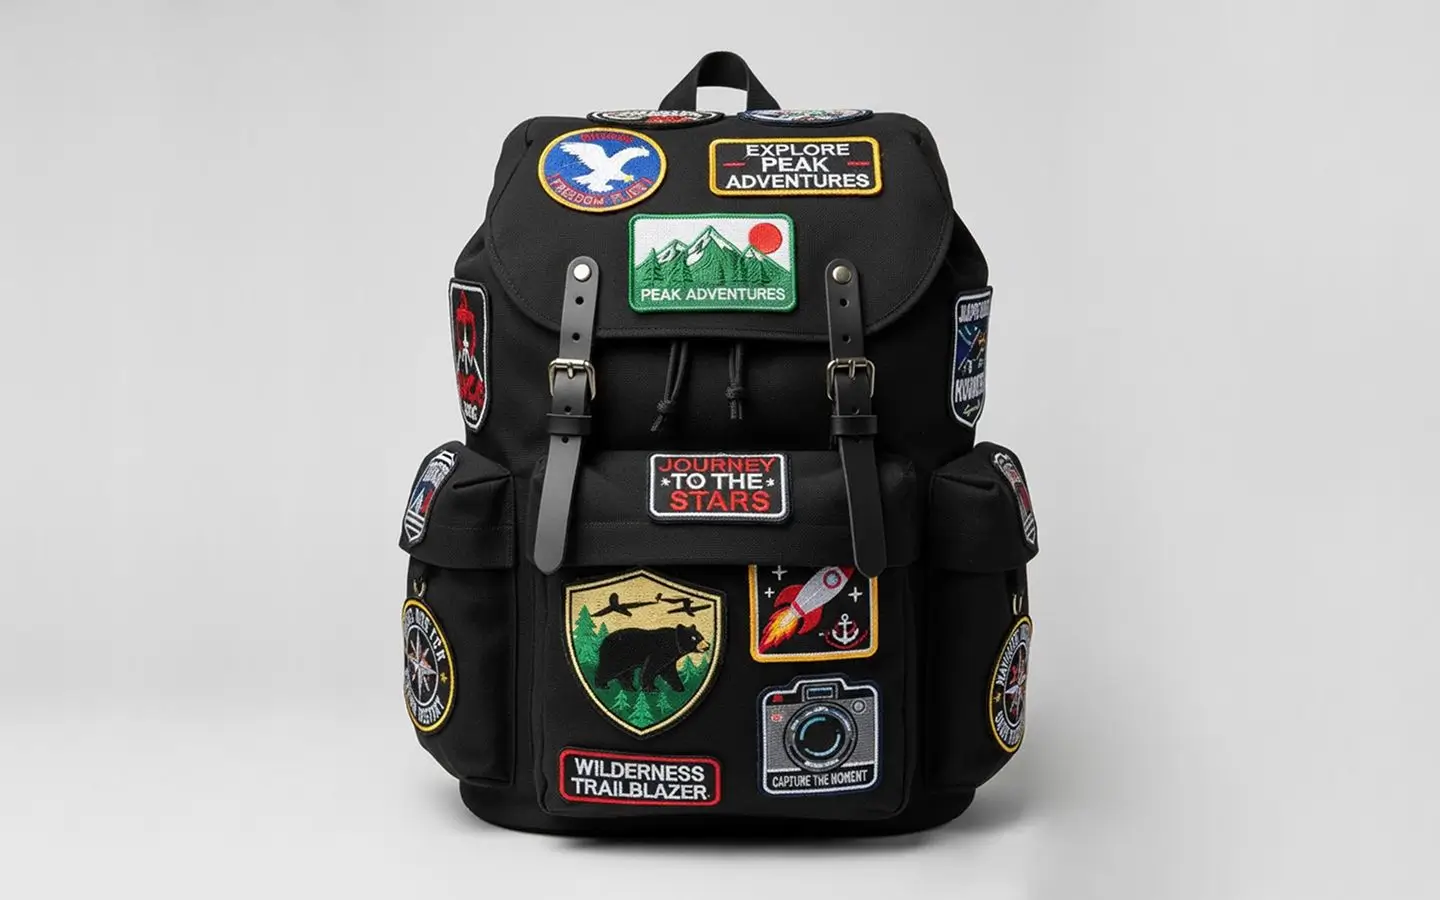
Iron-On Patches On Backpacks: Best Sizes & Spots
Small patches or large patches? It all depends on your backpack size and design. Learn how to position patches effectively, find useful sizing guides, and discover some interesting combinations that will help you position every patch perfectly.
Mastering Modern Iron-On Patches Placement Options for Bags
Personalising daily bags through vibrant fabric patches has been a growing fashion trend among students, travelers, as well as outdoor enthusiasts.
By adding colourful patches to bags, an ordinary canvas bag can be converted into a unique visual statement representing one’s creativity and fashion sense.
Choosing the appropriate size of patch, as well as patch placement, ensures that your bag looks fashionable rather than overloaded. Proper placement of patches will transform ordinary traveling gear into an attractive accessory.
Knowing how the patches of various sizes will fit into each panel of the bag helps in making sure that a neat and professional look is achieved every single time.
Elevate Front Pocket Style With Compact Patches
Front zip pockets in a bag stand out as the best area for showcasing small yet eye-catching fabric patches. Using circular and rectangular shape patches in this section will grab one’s attention easily without compromising the appearance of the entire bag.
Patches of two to three inches can easily fit into the limited space in the front pockets. Placing iron-on patches on bags provides an easy and effective way of adding visual appeal to backpacks.
Placing an eye-catching patch in the centre of the front pocket will result in an attractive look. This common patch placement spot will help you see your favorite artwork as you move about in the crowded city streets with your bag.
Maximise Main Flap Impact Using Large Patches
The big upper panel or main opening flap gives the biggest surface area to display your detailed, wide-format artwork design. The big patches that are four to six inches can be easily accommodated in these spacious canvases.
Putting your statement designs on main bag flaps leaves a very strong visual impact that gets noticed from far away. The bigger space enables your intricate designs, text slogans, and graphics to stand out without any problems.
Attaching your big patches on main flaps converts regular bags into a unique fashion statement. The bold centre placement makes sure that your main artwork is entirely visible even when the bag is packed with all the things inside.
Enhance Side Pocket Utility With Vertical Patches
Water bottle pockets and lateral zip compartments are perfect places to attach narrow patches and flags. Rectangular tall patches go hand in hand with the natural vertical lines of the side bags.
Patches one inch wide and three inches tall fit nicely into side pockets without interfering with any structural seams of your bag. Adding patches to the standard backpack side panel is a great way of adding a touch of personality that blends well with the main front designs.
A properly decorated side compartment makes sure that your bag is properly designed on all sides when commuting every day. Patch decorating on the side allows you to get a well-balanced design.
Protect Top Shoulder Straps With Mini Accents
The shoulder straps are a good place to mount mini accent patches and small security patches. The small patches of just one to two inches can be mounted easily on the padding of shoulder straps without affecting the adjusting buckles.
By mounting small patches at the top of your shoulder straps, your individual style is seen by all from the front when walking. Your small patch on your shoulder strap gives a nice military or tactical look, which attracts both outdoor enthusiasts and daily commuters.
Fastening light patches to padding straps prevents stiff folds in fabrics, guaranteeing full carrying comfort during a long trip. The placement of straps is an interesting addition that adds uniqueness to your bag compared to those from stores.
Personalise Lower Back Panels With Discreet Designs
The lower portion of the rear panel of a canvas bag provides a quiet semi-private place to show off personal interest patches or travel mementos. Patches of medium size, about three inches, fit easily above the bottom seam on the smooth rear fabric panels.
Putting artistic iron on patches custom on the rear panel allows you to keep your personal memories near without making your front panels too busy.
Placement of the rear panel makes the embroidery thread safe from weather damage and possible contact with abrasive surfaces. Subtle placement gives personal meaning to your bag without making the front look cluttered.
Streamline Multi Patch Layouts For Balanced Aesthetics
Organising several fabric patches in your bag panel entails proper planning to avoid a disordered look. Organising colours and patch designs in a uniform manner makes your bag design consistent with an appealing theme.
Leaving space of not less than one inch between patches guarantees that every patch maintains its independent look without blending with any neighboring seams. The incorporation of a large central patch with smaller patches on the sides produces a balanced design.
Proper planning and organisation of your patches on a flat surface before application guarantees symmetry of the design and makes your collection of patches fashionable.
Ensure Long-Lasting Adhesion On Synthetic Fabrics
Heat-sealing of patches on thick canvas or polyester bags requires correct heat levels to ensure permanent bonding of the adhesive. Covering the patch with a piece of thin cotton cloth keeps synthetic materials safe from heat when pressed.
Pressing with enough force for thirty seconds melts the back adhesive, ensuring that the fibres bond firmly with the material of the bag. Allowing the fabric to cool thoroughly before removing the bag ensures that the glue sets permanently.
The right amount of heat will prevent the patches from lifting or peeling off due to daily use and rain exposure. Spending time on pressing ensures that your personalised bag looks good for many years of travel.
Reinforce High Stress Zones With Simple Perimeter Stitches
The constant movement and weight, in addition to regular wear, will test any glue-based adhesives over time. However, a little stitch along the perimeter ensures that the patch cannot be removed mechanically.
A simple stitch along the mended borders will prevent lifting on pocket panels and other worn-out regions. Stitching twice to ensure that your favourite patches never come loose is a great idea when going on tough outdoor expeditions or when machine washing your gear. This combination of thermal sealing and edge stitching makes for the perfect protection of expensive or unique collectibles. Your personalised wear will remain safe wherever your day may lead you due to the added security.
Easy Answers To Decorate Backpacks With Patches
What temperature is ideal for applying iron-on patches to canvas backpacks?
The ideal temperature is medium-high heat between 150°C and 170°C, with all the steam settings off. A hot iron with a lot of pressure applied for 30 to 45 seconds melts the backing material into the canvas fibre.
Is it possible to apply iron-on patches on nylon or waterproof backpacks?
A high-heat application process will burn the surface of the material. When dealing with nylon bags, use a low heat setting or apply a pressing cloth to avoid burning the surface, or use sewing around the patch edges.
What is the most common place to apply a patch on a backpack?
The most preferred location is right at the centre of the front lower zipped pocket. The flat surface offers the best view, ironing, and balance, and it immediately makes the bag look better.
How can I keep the patch edges from detaching after some time?
Avoid the patch detaching by making sure that the adhesive is completely melted before placing the patch and sewing a few basic hand stitches at the corners of the outer border. High-stress corners will ensure durability.
Which size patch would be best for a small front backpack pocket?
Patches that are 2 to 3 inches in diameter are ideal for small front pockets. The patches create an ample border around the design to ensure that the patch does not appear crowded.
Conclusion
Customising backpacks by using iron-on patches is an enjoyable and innovative method of demonstrating your individuality through your everyday wearables.
Matching suitable patch sizes to corresponding bag sections will avoid fabric distortion and ensure maximum visibility during your travels throughout the day.
Using both correct heat-sealing and stitching around the edge of the patch ensures that your customised patches stay in place for many years. Following these easy-to-understand sizing and placement guidelines ensures that you will get professional and durable results without any difficulty.

As a fashion designer at Iron On Patches UK, I help businesses and people create custom iron-on patches. I help them with what I know about designing patches and what materials to use. I also talk about how to apply patches to different things and what’s popular in the patch world. My goal with the Iron-On Patches UK blog is to help people make premium patches that show their unique identity and how these patches can be a part of their brand. The Iron-On Patches UK blog is here to make it easy for people to customise their patches.